


Understanding Finish Trim: Styles, Materials, and Applications
Finish trim is an essential component of interior and exterior finishing that elevates the aesthetic appeal and functionality of any space. It encompasses a wide variety of moldings, baseboards, casings, and decorative wood elements that frame doors, windows, floors, and ceilings. Its importance extends beyond mere aesthetics; properly installed and chosen finish trim can improve room proportions, hide imperfections, and add architectural style that reflects personal taste and design trends. For homeowners, builders, and designers alike, understanding the nuances of finish trim—its styles, materials, and the best applications—can significantly enhance renovation projects and new constructions alike.
If you’re embarking on a home improvement journey, or simply want to upgrade your interior’s visual impact, exploring innovative options for Finish trim is an excellent starting point. With the right choices in design and materials, you can transform mundane spaces into warm, inviting environments that showcase craftsmanship and attention to detail.
Popular Styles of Finish Trim and Their Aesthetic Appeal
Finish trim styles have evolved significantly over the centuries, blending classical elegance with modern minimalism to create a broad spectrum of aesthetic options. Below are some of the most popular styles and their associated visual impacts:
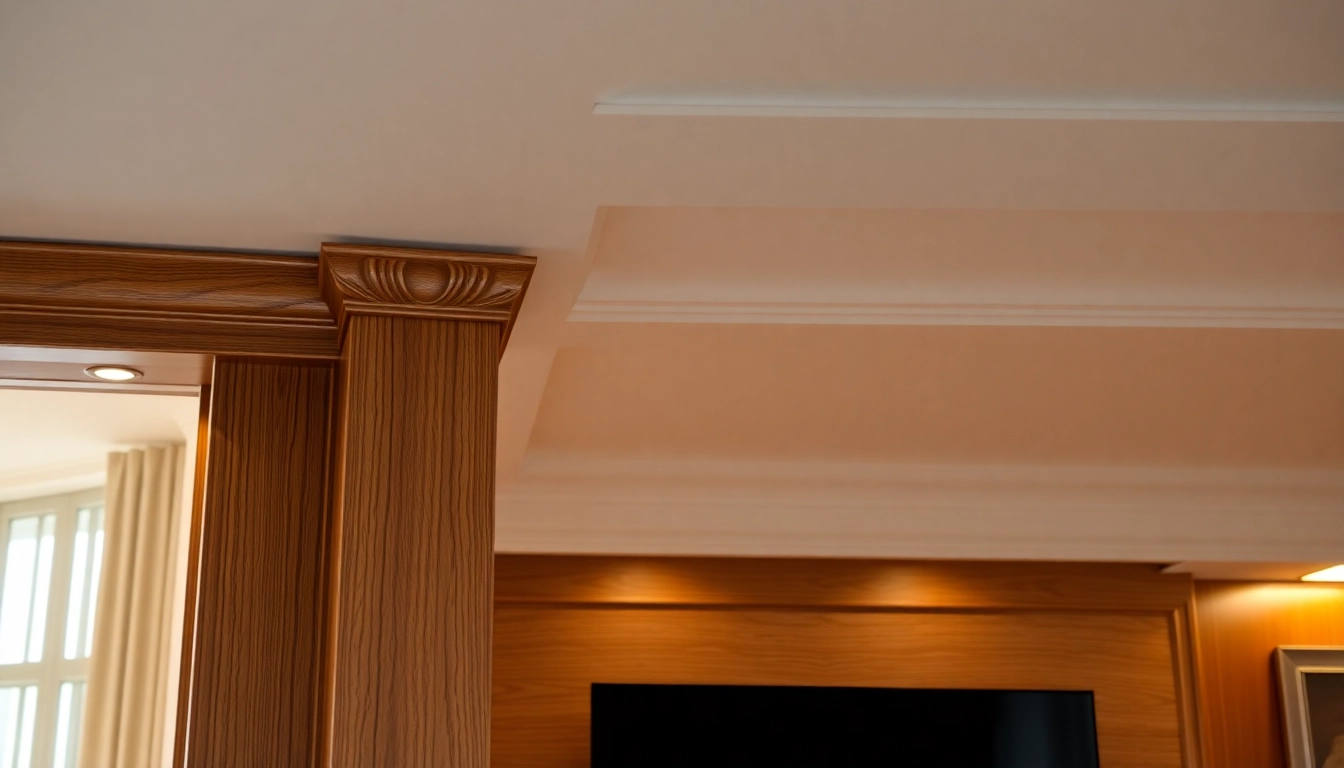
- Crown Molding: Classic crown molding adds a regal touch at the intersection of walls and ceilings. Its elaborate profiles can range from simple concave or convex curves to highly intricate designs. Crown molding offers a sense of grandeur and sophistication, often used in formal living rooms, dining areas, and foyers.
- Baseboards: These serve as a transition between walls and floors and can vary from sleek, contemporary designs to deeply detailed Victorian styles. A well-chosen baseboard enhances the continuity of a room’s decor and can make ceilings appear taller or room proportions more balanced.
- Door and Window Casings: Framing around doors and windows can dramatically influence a room’s character. Styles vary from plain, modern flat profiles to ornate, carved designs reminiscent of classical architecture. The casing style should complement both the overall architecture and other trim elements.
- Wainscoting and Paneling: These decorative wall treatments combine functional protection with aesthetic flair, often employing beadboard or raised panels. They evoke traditional craftsmanship and can add texture and depth to interior spaces.
- Decorative Moldings: Elements such as picture rails, chair rails, and dentil moldings enrich plain drywall, providing visual interest and accentuating architectural features. Contemporary designs may favor minimalist or sharp-edged trim, giving a cleaner and sleeker appearance.
Choosing the right style depends heavily on your home’s architectural style, your personal taste, and practical considerations—such as the scale of the space and lighting conditions. For instance, ornate moldings suit historic or classical interiors, while simple, clean lines complement contemporary and minimalist designs. Combining different styles can also create a unique layered look that balances tradition with modernity.
Choosing the Right Materials for Durability and Beauty
The selection of materials for finish trim is central to ensuring longevity, ease of installation, and visual appeal. Options range from traditional wood to composite and synthetic materials, each with their own trade-offs:
Wood
Often considered the premium choice, wood trim offers unmatched warmth and natural beauty. Common types include hardwoods such as oak, maple, and cherry, which are highly durable and can hold intricate profiles well. Softwoods like pine are more affordable and easier to work with but may be less resistant to damage or moisture. Finishing wood trim with high-quality stains or paints can further enhance its appearance and protect against wear.
Medium-Density Fiberboard (MDF)
MDF is a cost-effective, stable alternative to solid wood. It has a smooth surface ideal for painting, making it popular for modern interior trim. However, MDF is susceptible to moisture and moisture-related swelling, so it’s best suited for interior applications in dry areas.
PVC and Vinyl
Synthetic options like PVC and vinyl are resistant to moisture, insects, and harsh environmental conditions. They’re often selected for exterior trim, bathrooms, or basements. These materials are lightweight, easy to install, and require minimal maintenance but may lack the natural warmth of wood.
Composite and Hybrid Materials
Advances in material science have led to composite trims that combine wood fibers with plastic resins. These offer excellent durability, weather resistance, and low maintenance, making them suitable for both indoor and outdoor applications. They also often come pre-finished, reducing the need for additional staining or painting.
When choosing materials, consider the area of installation, budget constraints, maintenance expectations, and aesthetic goals. For instance, high-end interior trims benefit from solid wood’s richness but might not warrant the expense on less visible areas. Conversely, exterior trims demand weather-resistant materials for longevity.
Applications of Finish Trim in Different Home Areas
Finish trim’s versatility allows it to be incorporated strategically across various parts of a home, transforming ordinary spaces into showcases of design quality:
Living Rooms and Formal Areas
Elegant crown molding and wide baseboards create a stately ambiance. Here, more intricate profiles and high-quality materials are justified to evoke luxury and tradition.
Bedrooms
Subtle and understated trim, such as simple casings and narrow baseboards, can make bedrooms feel cozy. Decorative elements like wainscoting can add texture without overwhelming comfort.
Kitchen and Bathrooms
Durability and moisture resistance are crucial. Using PVC or sealed wood trims around cabinets, windows, and sinks prevent damage and maintain aesthetics.
Entryways and Foyers
Bold, ornate trim can make a striking first impression. Consider larger crown moldings and detailed door casings to frame the space impressively.
Exterior Applications
Finish trim on porches, door surrounds, and window accents boosts curb appeal. Material durability here is essential to withstand weather, so composites or treated woods are popular choices.
Understanding how to strategically apply different styles and materials ensures your finished project not only looks stunning but also performs well over time.
Step-by-Step Guide to Installing Finish Trim
Measuring and Planning Your Trim Layout
Accurate measurement and planning are the foundation of a successful finish trim project. Begin by thoroughly inspecting your space for any irregularities, such as uneven walls, ceilings, or floors. Use a high-precision tape measure and a level to determine where trims will sit and how pieces will fit together.
Draft detailed diagrams of your layout, noting the lengths of each piece and the locations of joints, corners, and miter cuts. Consider the height of baseboards in relation to furniture, the width of crown molding in proportion to ceiling height, and the placement of casing around doors and windows to achieve aesthetic harmony.
Make sure to stock additional trim materials—at least 10% extra—to account for mistakes or adjustments. Proper planning saves time and reduces waste during installation.
Additionally, planning your layout includes selecting appropriate tools such as miter saws, measuring tapes, pencils, and caulking guns, and ensuring your workspace is prepared for safe and efficient work.
Cutting and Fitting Trim Pieces Accurately
Precision is key when cutting finish trim. Use a high-quality miter saw to execute accurate 45-degree cuts for corners and joints. Always measure twice and cut once—neglecting this step can lead to gaps, misalignments, and rework. Employing a framing square or a combination square helps ensure consistent angles, particularly when dealing with complex corners.
When fitting pieces, temporarily hold them in place to verify fit and alignment. Sand or file any rough edges after cutting to ensure seamless joints. For irregular walls or ceilings, custom shimming might be necessary to create a flat, professional appearance.
For particularly challenging areas, consider scribing or using a contour gauge to trace profiles and replicate wall irregularities. This technique helps create tight seams and professional-looking joints, especially in older structures with uneven surfaces.
Incorporate spacers or shims as needed during installation to maintain consistent spacing, especially when aligning with existing trim or architectural features.
Securing and Finishing for a Polished Look
Secure trim pieces using finishing nails or trim screws, with the nail head slightly countersunk below the surface. Use a nail set to drive the nails just beneath the surface to facilitate smoothing and filling. For a smooth finish, choose nails with the appropriate gauge and length for your material and thickness.
Apply wood filler or painter’s putty over nail holes and joints, smoothing out with a putty knife. Once dry, sand these areas for a seamless appearance. If working with painted trim, ensure that filler is compatible with your finish type to prevent cracking or peeling.
For the final aesthetic touch, caulk gaps—especially at joints and corners—using a high-quality, paintable caulk. Smooth the caulk with a damp finger or caulk finishing tool for a clean, professional look.
Painting or staining comes last. Use painter’s tape to protect adjacent surfaces, and apply your finish with the appropriate brushes or rollers. Multiple thin coats yield better adhesion and finish quality compared to a single heavy layer.
Common Challenges and Expert Solutions in Finish Trim Projects
Dealing with Uneven Walls and Irregular Surfaces
One of the most frequent issues when installing finish trim is uneven walls or ceiling surfaces, resulting in gaps and unsightly seams. To address this, professionals often employ shims or contour scribing techniques.
Shims are thin pieces of wood or composite material used to level or adjust trim height, ensuring that installation remains consistent despite uneven surfaces. Scribing involves carefully tracing the wall’s profile onto the trim and cutting it to fit precisely. This method provides a seamless appearance even on older, irregular structures.
Preparation is key: sanding and cleaning surfaces prior to installation enhances adhesion and reduces the need for extensive adjustments later.
Achieving Seamless Joints and Corners
Perfectly fitting corners and joints require precise miter cuts and thoughtful assembly. Use high-quality miter saws with laser guides for accuracy. Practice cuts on scrap before working on the actual trim to prevent costly mistakes.
For internal corners, consider coping joints, which involve cutting along the profile of one piece to fit tightly against an adjoining piece—this technique compensates for wall angles that are not exactly 90 degrees and reduces visible gaps.
External corners often benefit from corner blocks or metal corner brackets, especially in larger or more complex projects, enhancing stability and consistency.
Surface Preparation and Optimal Painting Techniques
Surface preparation extends beyond wall irregularities. It includes proper sanding, cleaning, and priming. Primers improve paint adhesion, especially on raw or stained wood, and help prevent bleed-through.
Expert painters often apply a high-quality primer, followed by multiple thin coats of paint or stain. Using the right sheen—such as semi-gloss or satin—enhances durability and ease of cleaning for trim surfaces.
For best results, allow sufficient drying time between coats and avoid painting in high humidity or extreme temperatures, which can compromise finish integrity.
Finishing Touches to Elevate Your Finish Trim
Choosing Paint or Stain to Enhance Woodgrain
Enhancing the natural beauty of wood trim involves selecting appropriate stains or paints. Clear or tinted stains highlight the grain and texture of hardwoods, lending warmth and richness to interior decor. For a sleek, modern look, paint with high-quality, durable finishes like semi-gloss or satin sheen is preferred.
Consider color palette harmony with the overall room design. Light-colored paints can make small spaces feel larger, while darker shades add sophistication and depth.
Applying Caulk and Filling Gaps for a Smooth Finish
Gaps and joints are natural in construction but should be concealed for a polished appearance. Use paintable caulk to fill these gaps, tooling it smoothly to blend with the trim. Multiple applications may be necessary for larger gaps, with sanding or touch-up between coats for a flawless result.
Adding Decorative Accents for Personalized Style
To personalize your trim, consider adding decorative elements such as rosettes, medallions, or custom molding profiles. Painting contrasting accents or using metallic leafing can also add an element of luxury. Incorporating LED indirect lighting behind crown moldings enhances ambiance and offers a modern twist on traditional trim design.
Maintaining and Enhancing Finish Trim Over Time
Cleaning Tips to Preserve the Finish
Regular dusting with a soft cloth prevents dirt buildup. When cleaning, avoid harsh chemicals that can strip finishes; instead, use mild soap with water or specialized wood cleaners. For painted trim, touch up scuffed or chipped areas promptly to prevent further damage.
Refinishing or Repainting Strategies
Over time, even the most durable finishes may require refinishing. Light sanding followed by reapplication of stain or paint can restore the desired look. In cases of deep scratches or damage, stripping and completely refinishing the trim may be necessary. Always match the original finish for consistency.
When to Consider Replacing Aged or Damaged Trim
If the trim shows signs of rot, persistent damage, or warping beyond repair, replacement is advisable. New trim offers an opportunity to update styles or materials, aligning with current design trends and achieving a fresh, renewed look.